
Initial Setup
Overview
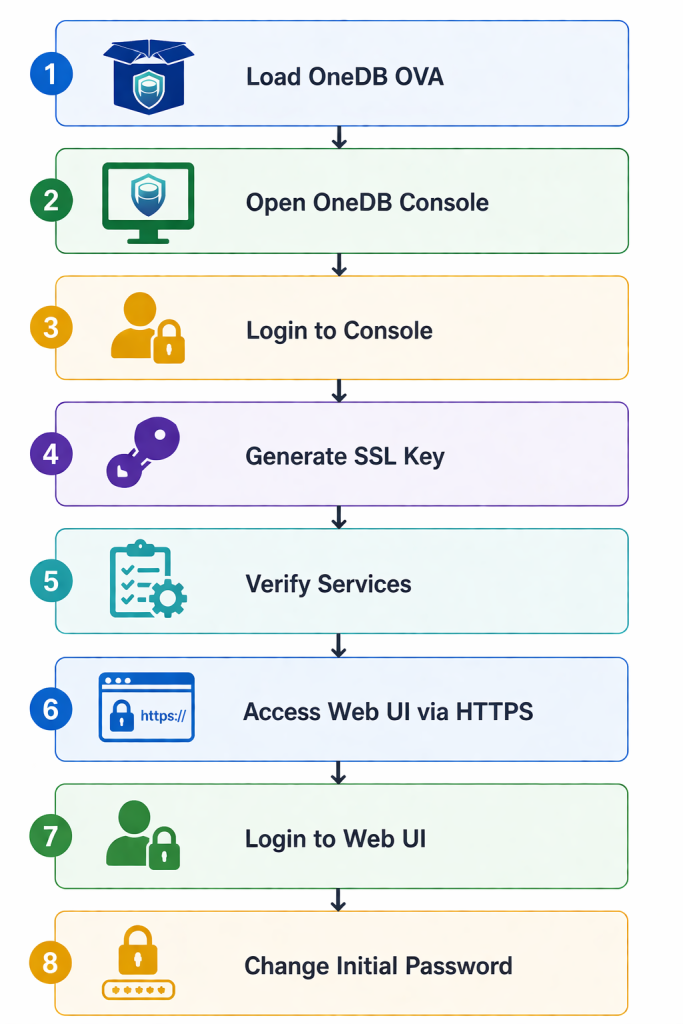
This section explains the initial setup process for OneDB Security Appliance after the OVA file has been deployed. The setup includes accessing the OneDB console, generating an SSL certificate with Subject Alternative Name support, verifying service status, accessing the OneDB Web UI, and changing the initial administrator password.
OneDB includes a setup menu that allows administrators to generate an SSL key to secure communication between the client browser and the OneDB server.
Load the OVA File
Deploy or load the OneDB OVA file into the virtualization environment.
After the OVA has been started, open the console of the virtual machine.
The console will display the IP address assigned to the OneDB server.
Example:
OneDB Application Server
Running On IP : 192.168.114.128
Mon Feb 2 2026 15:29:49
---------------------------------------------
onedb-app login:
Use this IP address to access the OneDB console and Web UI.
Login to OneDB Security Appliance
Login to the OneDB console using the IP address where the OVA is installed.
Use the console credentials provided during deployment or by your OneDB administrator.
| Field | Value |
|---|---|
| Username | Provided during deployment |
| Password | Provided during deployment |
After a successful login, the OneDB console main menu will be displayed.
Initial Web Application Status
During the first installation, you can verify the OneDB service status from the console menu.
From the Main Menu, select:
1) ServicesThen select:
2) List ServicesThis menu displays the services running under the OneDB system, including the Web Application service.
In a fresh installation, the Web Application status may appear as:
Service Status

+-------------------+-------------+
| Service           | Status      |
+-------------------+-------------+
| SSH               | RUNNING     |
| Database Service  | RUNNING     |
| Web Application   | NOT RUNNING |
| Api Interface     | RUNNING     |
+-------------------+-------------+
As shown above, the status is displayed as NOT RUNNING. This usually indicates that the SSL key has not been generated yet.
To securely access the OneDB Web UI, generate the SSL key from the Setup menu first.
Generate SSL Key
To generate the SSL key, follow the steps below.
Step 1 – Open Setup Menu
From the Main Menu, select:
3) SetupStep 2 – Select Generate SSL Key
From the Setup menu, select:
2) Generate SSL KeyStep 3 – Enter SSL Certificate Information
You will be prompted to enter the SSL certificate information.
Fill in the required information:
| Field | Description |
|---|---|
| Common Name | The hostname or IP address used to access OneDB. |
| Organizational Unit | The department or business unit name. |
| Organization | The organization or company name. |
| City / Locality | The city name. |
| State / Province | The state or province name. |
| Country | The country code or country name. |
Common Name (CN): onedb.local
Organizational Unit (OU): Security Team
Organization (O): One Data Security Pte Ltd
City/Locality (L): Singapore
State/Province (S): Singapore
Country (C): SG
Step 4 – Configure Subject Alternative Names
After entering the certificate information, OneDB displays a list of suggested Subject Alternative Name (SAN) entries.
SAN entries identify the DNS names and IP addresses that are permitted when clients connect securely to OneDB.
The suggested entries may include:
DNS:localhost
DNS:onedb-app
DNS:onedb-app.local
IP:127.0.0.1
IP:192.168.114.140
The suggested values are generated from the OneDB appliance hostname, local hostname aliases, loopback address, and detected network IP addresses.
When prompted:
Use these suggested SAN values? (yes/no):Enter yes to include the suggested entries or no to configure the SAN entries manually.
It is recommended to include every hostname or IP address that administrators, applications, database clients, load balancers, or cluster nodes will use to connect to OneDB.
Step 5 – Add Additional SAN Entries
Additional SAN entries can be added when OneDB will be accessed through another hostname or IP address.
Examples include:
DNS:onedb.company.local
DNS:onedb.example.com
IP:10.10.10.11
Common reasons for adding extra SAN entries include:
- A corporate DNS or fully qualified domain name
- A virtual IP address
- A load-balancer hostname
- A cluster-node hostname
- A management network IP address
- An application-facing hostname
Enter one SAN entry at a time. Leave the input blank and press Enter when all required SAN entries have been added.
Use the following format:
DNS:<hostname>
IP:<ip-address>
Examples:
DNS:onedb.company.local
IP:10.10.10.11
Step 6 – Enter the Keystore Password
Enter the password that will be used to protect the SSL keystore.
Use a strong password and store it securely according to the organization’s password-management policy.
The password is not displayed while it is being entered.
After the information has been validated, OneDB generates the SSL key and certificate.
If the process is successful, the following message will appear:
✅ Key generated successfully
Verify OneDB Services
After the SSL key has been generated, return to the Main Menu.
Select:
1) ServicesThen select:
2) List ServicesUse this menu to verify whether the OneDB services are running properly.
Service Status

+-------------------+-------------+
| Service           | Status      |
+-------------------+-------------+
| SSH               | RUNNING     |
| Database          | RUNNING     |
| Web Application   | RUNNING     |
| Api Interface     | RUNNING     |
+-------------------+-------------+
As shown above, the Web Application service status is displayed as RUNNING. This indicates that the SSL key has been generated successfully and the Web Application service is active.
Access OneDB Web UI
After the services are running, open a browser and access the OneDB Web UI using HTTPS.
https://<onedb-hostname>:8443Example:
https://192.168.114.128:8443The OneDB Web UI uses HTTPS on port 8443.
Login to OneDB Web UI
Login to the OneDB Web UI using the initial administrator credentials provided during deployment.
| Field | Value |
|---|---|
| Username | admin |
| Password | password |
The initial administrator default password will be changed after the first login.
Change Initial Password
After logging in to the OneDB Web UI for the first time, change the initial password immediately.
This step is required to prevent unauthorized access using temporary or default credentials.
Recommended password practices:
| Recommendation | Description |
|---|---|
| Use a strong password | Use a combination of uppercase letters, lowercase letters, numbers, and special characters. |
| Avoid default passwords | Do not continue using the initial password after setup. |
| Store securely | Store the password according to the organization’s password management policy. |
| Limit access | Only authorized administrators should have access to the OneDB administrator account. |
Initial Setup Flow
Notes
During the first installation, the Web Application may remain in NOT RUNNING status until the SSL key has been generated.
The SSL certificate should include the hostname or IP address used to access OneDB as a Subject Alternative Name. When a client connects using a hostname or IP address that is not included in the certificate, the client may display a certificate hostname-validation warning or reject the connection.
If OneDB will be accessed through multiple addresses, include all required DNS names and IP addresses during SSL key generation.
After the SSL key has been generated and the services are running, access the OneDB Web UI using:
https://<onedb-hostname>:8443For security reasons, change all initial or default credentials immediately after the first login.
